2019-7-06 17:11:52
第4章 同步并发操作
4.1 等待一个事件或其他条件
在多线程同步过程中,很多时候需要进行同步等待,可以使用std::this_thread::sleep_for()方法来进行周期性的间歇。如下:
bool flag;
std::mutex m;

void wait_for_flag()
{
    std::unique_lock<std::mutex> lk(m);
    while(!flag) {
        //解锁互斥量

        lk.unlock();
        //休眠 100ms

        std::this_thread::sleep_for(std::chrono::milliseconds(100));
        //解锁互斥量

        lk.lock();
    }
}
标准库使用相关条件达成来,进行线程同步。
| 方法 | 区别 |
|---|---|
std::condition_variable |
仅限于与std::mutex一起工作 |
std::condition_variable_any |
任何条件上工作,但是会产生额外的开销 |
使用示例:
std::mutex mut;
//数据队列

std::queue<data_chunk> data_queue;
//环境检测变量

std::condition_variable data_cond;

void data_preparation_thread()
{
    while(more_data_to_prepare())
    {
        //准备数据

        data_chunk const  data=prepare_data();
        //当前线程加锁操作

        std::lock_guard<std::mutex> lk(mut);
        //发生环境改变信号

        data_cond.ontify_one();
    }
}

void data_processing_thread()
{
    while(true) {
        //信号量加锁

        std::unique_lock<std::mutex> lk(mut);
        //等待,直到获得响应

        data_cond.wait(
            lk,[]{return !data_queue.empty();}
            );
        //获取头部数据

        data_chunk data=data_queue.front();
        //弹出

        data_queue.pop();
        //解锁

        lk.lock();

    }
}
4.1.2 使用条件变量构建线程安全队列
线程安全的基本操作push()和wait_and_pop():
#include <queue>

#include <memory>

#include <mutex>

#include <condition_variable>

template <typename T>
class threadsafe_queue
{
private:
    //互斥量必须是可变的

    mutable std::mutex mut;
    std::queue<T> data_queue;
    std::condition_variable data_cond;

public:
    threadsafe_queue(){}
    threadsafe_queue(threadsafe_queue const& other)
    {
        //为其它类的信号量,加锁

        std::lock_guard<std::mutex> lk(other.mut);
        //进行拷贝

        data_queue=other.data_queue;
    }
    ~threadsafe_queue();
    void push(T new_value)
    {
        //添加锁

        std::lock_guard<std::mutex> lk(mut);
        data_queue.push(new_value);
        //发射改变环境变量,触发一个正在等待的线程,取检查wait函数的返回状态

        data_cond.notify_one();
    }

    void wait_and_pop(T& value)
    {
        //添加锁

        std::unique_lock<std::mutex> lk(mut);
        //等待队列中存在数据

        data_cond.wait(lk,[this]{return !data_queue.empty();});
        //获取数据

        value=data_queue.front();
        //取出数据

        data_queue.pop();
    }
    std::shared_ptr<T> wait_and_pop()
    {
        std::unique_lock<std::mutex> lk(mut);
        //等待直到数据为空

        data_cond.wait(lk,[this]{return !data_queue.empty();});
        //返回队列中的引用指针

        std::shared_ptr<T> res(std::make_shared<T>(data_queue.front()));
        data_queue.pop();
        return res;

    }
    //非线程安全的存取函数

    bool try_pop(T& value)
    {
        std::lock_guard<std::mutex> lk(mut);
        if(data_queue.empty())
            return  false;
        value=data_queue.front();
        data_queue.pop();
        return  true;
    }
    //元素出栈

    std::shared_ptr<T> try_pop()
    {
        std::lock_guard<std::mutex> lk(mut);
        if(data_queue.empty())
        {
            return std::shared_ptr<T>();
        }
        std::shared_ptr<T> res(std::make_shared<T>(data_queue.front()));
        data_queue.pop();
        return res;
    }

    bool empty() const
    {
        std::lock_guard<std::mutex> lk(mut);
        return data_queue.empty();
    }


};
4.2 使用期望等待一次性时间
参考链接: C++11多线程future的使用;std::future , std::promise和线程的返回值;std::future;std::thread;
C++ 中的future用来表示等待中的一次性事件。它的主要功能是将多线程同步或者异步的数据作为结果保存,在执行操作之后进行提取
//cppreferencr 示例
//

#include <iostream>

#include <future>

#include <thread>

int main()
{
    // 来自 packaged_task 的 future

    // 包装函数

    std::packaged_task<int()> task([](){ return 7; });
    // 获取 future

    std::future<int> f1 = task.get_future();
    // 在线程上运行

    std::thread(std::move(task)).detach();
    // 来自 async() 的 future

    std::future<int> f2 = std::async(std::launch::async, [](){ return 8; });
    // 来自 promise 的 future

    std::promise<int> p;
    std::future<int> f3 = p.get_future();
    std::thread( [&p]{ p.set_value_at_thread_exit(9); }).detach();

    std::cout << "Waiting..." << std::flush;
    f1.wait();
    f2.wait();
    f3.wait();
    std::cout << "Done!\nResults are: "
              << f1.get() << ' ' << f2.get() << ' ' << f3.get() << '\n';
}
//result

//Waiting...Done!

//Results are: 7 8 9
使用std::async异步向函数传递参数,std::launch::defered调用方线程上首次请求其结果时执行任务(惰性求值);std::launch::async运行新线程,以异步执行任务
#include <string>

#include <future>
//创建函数结构体

struct X
{
    void foo(int,std::string const&);
    std:string bar(std::string const&);
};
X x;
//调用x中的函数x->foo(42,"hello");

auto f1=std::async(&X::foo,&x,42,"hello");
//调用 bar函数

auto f2=std::async(&X::bar,x,"goodbye");

struct Y
{
    double operator()(double);
};

Y y;
//先构造Y,再进行一次拷贝构造,条用 拷贝的operator()操作

auto f3=std::async(Y(),3.141);

auto f4=std::async(std::ref(y),2.718);

X baz(X&);
// 调用 baz(x)

std::async(baz,std::ref(x));
class   move_only
{
public:
    move_only();
    move_only(move_only&&);
    move_only(move_only const&)=delete;
    move_only& operator=(move_only&&);
    move_only& operator=(move_only const&)=delete;
    void operator()();
}
//调用tmp(),tmp是通过std::move(move_only())构造得到

auto f5=std::async(move_only());
//在新线程上执行

auto f6=std::async(std::launch::async,Y(),1.2);
//调用wait()或者get()进行同步

auto f7=std::async(std::launch::deferred,baz,std::ref(x));
//实现选择执行方式

auto f8=std::async(std::launch::deferred|std::launch::async,baz,std::ref(x));

auto f9=std::async(baz,std::ref(x));
//调用延迟函数

f7.wait();
4.2.2 任务与期望
参考链接: std::packaged_task;
#include <iostream>

#include <cmath>

#include <thread>

#include <future>

#include <functional>

// 避免对 std::pow 重载集消歧义的独有函数

int f(int x, int y) { return std::pow(x,y); }

void task_lambda()
{
    std::packaged_task<int(int,int)> task([](int a, int b) {
        return std::pow(a, b);
    });
    std::future<int> result = task.get_future();

    task(2, 9);

    std::cout << "task_lambda:\t" << result.get() << '\n';
}

void task_bind()
{
    std::packaged_task<int()> task(std::bind(f, 2, 11));
    std::future<int> result = task.get_future();

    task();

    std::cout << "task_bind:\t" << result.get() << '\n';
}

void task_thread()
{
    std::packaged_task<int(int,int)> task(f);
    std::future<int> result = task.get_future();

    std::thread task_td(std::move(task), 2, 10);
    task_td.join();

    std::cout << "task_thread:\t" << result.get() << '\n';
}

int main()
{
    task_lambda();
    task_bind();
    task_thread();
}
//结果

// task_lambda: 512

// task_bind:   2048

// task_thread: 1024
使用 std::packaged_task执行一个图形界面的线程
#include    <deque>

#include    <mutex>

#include    <future>

#include    <thread>

#include    <utility>

std::mutex  m;
std::deque<std::packaged_task<void()>   >   tasks;
bool    gui_shutdown_message_received();
void    get_and_process_gui_message();
//GUI线程

void    gui_thread()
{
    //是否收到对应信息

        while(!gui_shutdown_message_received())
        {
                get_and_process_gui_message();
                //创建任务线程

                std::packaged_task<void()>  task;
                {
                        //数据信号量加锁

                        std::lock_guard<std::mutex> lk(m);
                        if(tasks.empty())
                                continue;
                        //移动权柄

                        task=std::move(tasks.front());
                        //取出首元素

                        tasks.pop_front();
                }
                //执行任务

                task();
        }
}

std::thread gui_bg_thread(gui_thread);

template<typename   Func>

std::future<void> post_task_for_gui_thread(Func   f)
{
    //创建任务

    std::packaged_task<void()>  task(f);
    //获取任务返回结果

    std::future<void>   res=task.get_future();
    //当前线程上锁

    std::lock_guard<std::mutex> lk(m);
    //转移任务权柄,将当前任务,添加到列表

    tasks.push_back(std::move(task));
    //返回执行结果

    return  res;
}
4.2.3 使用 std::promises
参考链接: std::promise;
std::promises有且只使用一次
使用示例:
#include <vector>

#include <thread>

#include <future>

#include <numeric>

#include <iostream>

#include <chrono>

void accumulate(std::vector<int>::iterator first,
                std::vector<int>::iterator last,
                std::promise<int> accumulate_promise)
{
    int sum = std::accumulate(first, last, 0);
    // 提醒 future

    accumulate_promise.set_value(sum);
}

void do_work(std::promise<void> barrier)
{
    std::this_thread::sleep_for(std::chrono::seconds(1));
    barrier.set_value();
}

int main()
{
    // 演示用 promise<int> 在线程间传递结果。

    std::vector<int> numbers = { 1, 2, 3, 4, 5, 6 };
    std::promise<int> accumulate_promise;
    std::future<int> accumulate_future = accumulate_promise.get_future();
    //创建工作线程

    std::thread work_thread(accumulate, numbers.begin(), numbers.end(),
                            std::move(accumulate_promise));
    // 等待结果

    accumulate_future.wait();
    std::cout << "result=" << accumulate_future.get() << '\n';
    // wait for thread completion

    work_thread.join();
    // 演示用 promise<void> 在线程间对状态发信号

    std::promise<void> barrier;
    std::future<void> barrier_future = barrier.get_future();
    std::thread new_work_thread(do_work, std::move(barrier));
    barrier_future.wait();
    new_work_thread.join();
}
4.2.4 为“期望”存储“异常”
可以使用std::future实现对与异常的捕获,在使用std::promise的时候可以,使用set_exception()成员函数进行异常的捕获。
extern  std::promise<double>    some_promise;
try
{
    some_promise.set_value(calculate_value());
}
catch(...)
{
    some_promise.set_exception(std::current_exception());
    //std::copy_exception()   会直接存储一个新的异常而不抛出

    some_promise.set_exception(std::copy_exception(std::logic_error("foo")));

}
4.2.5 多个线程的等待
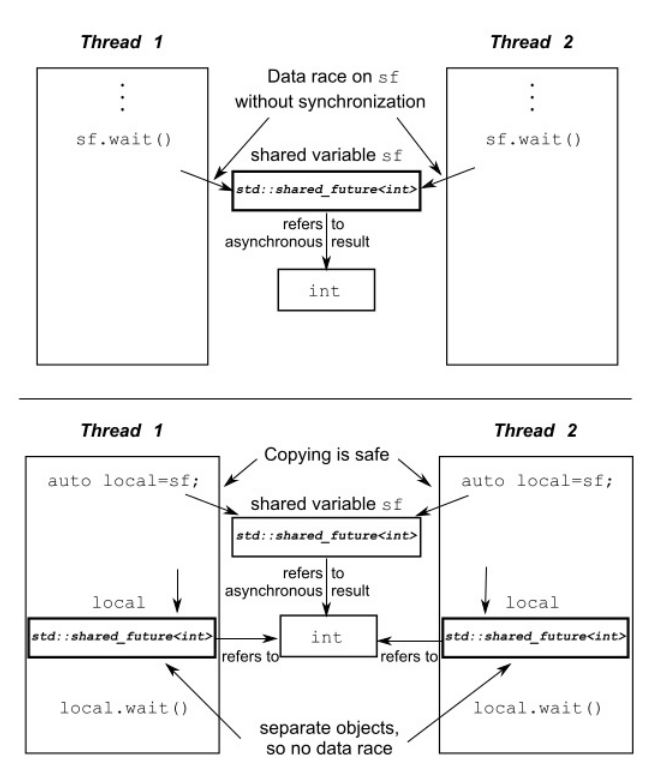
参考链接: std::shared_future;
因为std::future的get()方法,可以获取最终结果,但这些都是一次性的,也就说明,不能被多个线程同时使用–一个线程获取之后就结束了。这是因为:std::future模型独享同步结果的所有权。
使用std::shared_future可以让多个线程等待同一个事件。std::future是只移动的,在不同实例中相互传递的只是其所有权限。而std::shared_future实例是可拷贝的,所以多个对象可以引用同一关联“期望”的结果。但是因为,每个独立对象上,成员函数调用返回的结果是不同步的,需要加锁进行数据保护。
 ;
;
使用示例:
#include <iostream>

#include <future>

#include <chrono>

int main()
{
    std::promise<void> ready_promise, t1_ready_promise, t2_ready_promise;
    std::shared_future<void> ready_future(ready_promise.get_future());

    std::chrono::time_point<std::chrono::high_resolution_clock> start;

    auto fun1 = [&, ready_future]() -> std::chrono::duration<double, std::milli>
    {
        t1_ready_promise.set_value();
        // 等待来自 main() 的信号

        ready_future.wait();
        return std::chrono::high_resolution_clock::now() - start;
    };


    auto fun2 = [&, ready_future]() -> std::chrono::duration<double, std::milli>
    {
        t2_ready_promise.set_value();
        // 等待来自 main() 的信号

        ready_future.wait();
        return std::chrono::high_resolution_clock::now() - start;
    };

    auto result1 = std::async(std::launch::async, fun1);
    auto result2 = std::async(std::launch::async, fun2);
    // 等待线程变为就绪

    t1_ready_promise.get_future().wait();
    t2_ready_promise.get_future().wait();
    // 线程已就绪,开始时钟

    start = std::chrono::high_resolution_clock::now();
    // 向线程发信使之运行

    ready_promise.set_value();

    std::cout << "Thread 1 received the signal "
              << result1.get().count() << " ms after start\n"
              << "Thread 2 received the signal "
              << result2.get().count() << " ms after start\n";
}
4.3 限定等待时间
之前的所有阻塞调用,将会阻塞一段不确定的时间,将线程挂起直到等待的事件发
生。可以使用std::condition_variable成员函数的wait_for()和wait_until进行相对时间和绝对时间的等待。
4.3.1 时钟
参考链接:
- [标准库头文件
](https://zh.cppreference.com/w/cpp/header/chrono);
注意:std::chrono::system_clock是不稳定的,std::chrono::steady_clock是稳定的。
4.3.2 时延
std::chrono::duration<> 函数模板能够对时延进行处理(线程库使
用到的所有C++时间处理工具,都在 std::chrono 命名空间内)(std::chrono::duration)。
简单的等待示例:
std::future<int> f=std::async(some_task);
//如果等待结果是期望状态改变,而不是超时,则执行下面的操作。

if(f.wait_for(std::chrono::milliseconds(35))==std::future_status::ready)
    do_something_with(f.get());
4.3.3 时间点
使用std::chrono::time_point<>来获取时间点。
auto  start=std::chrono::high_resolution_clock::now();
do_something();
auto    stop=std::chrono::high_resolution_clock::now();
std::cout<<"do_something()  took"
        <<std::chrono::duration<double,std::chrono::seconds>(stop-
start).count()
        <<" seconds"<<std::endl;
4.3.4 具有超时功能的函数
可接受超时的函数
| 类型/命名空间 | 函数 | 返回值 | |
|---|---|---|---|
std::this_thread[namespace] |
sleep_for(duration) |
N/A | |
sleep_for(duration) |
|||
std::condition_variable或std::condition_variable_any
|
wait_for(lock,duration) |
std::cv_status::time_out |
|
wait_until(lock,time_point) |
|||
wait_for(lock,duration,predicate) |
|||
wait_until(lock,duration,predicate) |
|||
std::timed_mutex或std::recuresive_timed_mutex
|
try_lock_for(duration) |
bool–获取锁时返回true,否则返回false | |
try_lock_until(time_point) |
|||
std::unique_lock<TimedLockable> |
unique_lock(lockable,duration) |
N/A——对新构建的对象调用owns_lock(); | |
unique_lock(lockable,time_point) |
|||
try_lock_for(duration) |
|||
try_lock_until(time_point) |
|||
std::future<ValueType>或std::shared_future<ValueType> |
wait_for(duration) |
当等待超时,返回std::future_status::timeout
|
|
wait_until(time_point) |
|||
4.4 使用同步操作简化代码
4.4.1 使用“期望”的函数话编程
函数式编程(functional programming):编程结果只依赖于传入的参数,并不依赖外部状态。当输入相同时,输出结果仅仅和输入有关与次数无关。
快速排序:
template<typename T>
std::list<T> sequential_quick_sort(std::list<T> input)
{
    if(input.empty())
    {
        return input;
    }
    std::list<T> result;
    //将input的首个元素,赋值给result

    result.splice(result.begin(),input,input.begin());

    T const& pivot=*result.begin();
    //重置矩阵并返回首部元素,指向大于中间值的最接近的元素

    auto divide_point=std::partition(input.begin(),input.end(),[&](T const& t){
        return t<pivot;
    });
    std::list<T> lower_part;
    //将小于divide_point的数,传递给lower_part;

    lower_part.splice(lower_part.end(),input,input.begin(),divide_point);
    //递归调用排序,使用move避免大量的拷贝操作

    auto new_lower(sequential_quick_sort(std::move(lower_part)));
    auto new_higher(sequential_quick_sort(std::move(input)));
    //将数据进行拼接

    result.splice(result.end(),new_higher);

    result.splice(result.begin(),new_lower);

    return result;
}
快速排序“期望” 并行版
template <T>
std::list<T> parallel_quick_sort(std::list<T> input)
{
if(input.empty())
{
return input;
}
std::list<T> result;
result.splice(result.begin(),input,input.begin());
T const& pivot=*result.begin();
auto divide_point=std::partition(input.begin(),input.end(),
[&](T const& t){return t<pivot;});
std::list<T> lower_part;
lower_part.splice(lower_part.end(),input,input.begin(),divide_point);
//开启异步线程执行程序
std::future<std::list<T>> new_lower(std::async(¶llel_quick_sort<T>,std::move(lower_part)));
auto new_higher(parallel_quick_sort(std::move(input)));
result.splice(result.end(),new_higher);
result.splice(result.begin(),new_lower.get());
return result
}
注意:这里多线程的时间统计一定不要用clock()它是根据cpu时钟执行次数来的,对于多线程不准确。更改之后时间仍旧感人;多线程没有单线程块。初步估计是编译器优化原因。这里更改之后发现线程开始的开销要大的多,建议使用openmp来进行更改。
第5章 C++内存模型和原子类型操作
5.1.1 对象和内存位置
这个之前在c++primer学习笔记中有详细介绍,不过多叙述。
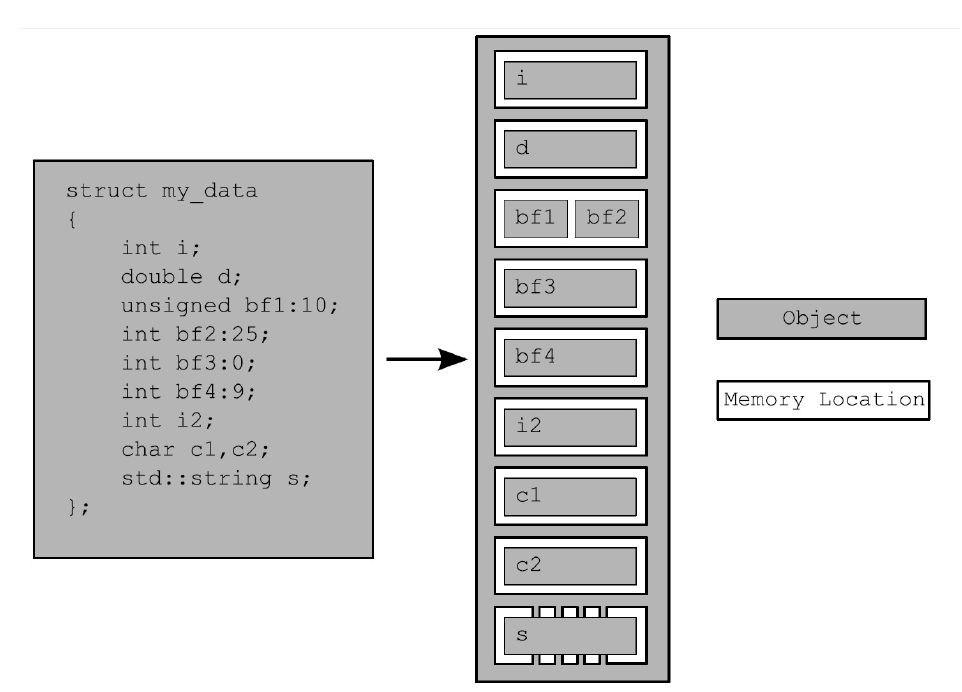
四个原则:
- 每个变量都是一个对象,包括作为其成员变量的对象
- 每个对象至少占有一个内存位置
- 基本类型都有确定的内存位置(无论大小类型如何,即使他们是相邻的,或是数组的一部分)
- 相邻位域是相同内存中的一部分
5.2 c++中的原子操作和原子类型
参考链接: C++ 原子操作(6种原子顺序);如何理解 C++11 的六种 memory order;C++11之atomic原子操作; 理解 C++ 的 Memory Order ;
5.2.1 标准原子类型
标准原子类型定义在头文件<atomic>中。这些类型上的所有操作都是原子的,在语言定义中只有这些类型的操作是原子的,不过你可以用互斥锁来模拟原子操作。
标准原子类型的备选名和与其相关的std::atomic<>特化类
| 原子类型 | 相关特化类 |
|---|---|
atomic_bool |
std::atomic<bool> |
atomic_char |
std::atomic<char> |
atomic_schar |
std::atomic<signed char> |
atomic_uchar |
std::atomic<unsigned char> |
atomic_int |
std::atomic<int> |
atomic_uint |
std::atomic<unsigned> |
atomic_short |
std::atomic<short> |
atomic_ushort |
std::atomic<unsigned short> |
atomic_long |
std::atomic<long> |
atomic_ulong |
std::atomic<unsigned long> |
atomic_llong |
std::atomic<long long> |
atomic_ullong |
std::atomic<unsigned long long> |
atomic_char16_t |
std::atomic<char16_t> |
atomic_char32_t |
std::atomic<char32_t> |
atomic_wchar_t |
std::atomic<wchar_t> |
标准原子类型定义(typedefs)和对应的内置类型定义(typedefs)
| 原子类型定义 | 标准库中相关类型定义 |
|---|---|
| atomic_int_least8_t | int_least8_t |
| atomic_uint_least8_t | uint_least8_t |
| atomic_int_least16_t | int_least16_t |
| atomic_uint_least16_t | uint_least16_t |
| atomic_int_least32_t | int_least32_t |
| atomic_uint_least32_t | uint_least32_t |
| atomic_int_least64_t | int_least64_t |
| atomic_uint_least64_t | uint_least64_t |
| atomic_int_fast8_t | int_fast8_t |
| atomic_uint_fast8_t | uint_fast8_t |
| atomic_int_fast16_t | int_fast16_t |
| atomic_uint_fast16_t | uint_fast16_t |
| atomic_int_fast32_t | int_fast32_t |
| atomic_uint_fast32_t | uint_fast32_t |
| atomic_int_fast64_t | int_fast64_t |
| atomic_uint_fast64_t | uint_fast64_t |
| atomic_intptr_t | intptr_t |
| atomic_uintptr_t | uintptr_t |
| atomic_size_t | size_t |
| atomic_ptrdiff_t | ptrdiff_t |
| atomic_intmax_t | intmax_t |
| atomic_uintmax_t | uintmax_t |
它们有一个相当简单的模式;对于标准类型进行typedef T,相关的原子类型就在原来的类型名前加上atomic_的前缀:atomic_T。除了singed类型的缩写是s,unsigned的缩写是u,和long long的缩写是llong之外,这种方式也同样适用于内置类型。对于std::atomic
一般情况下,标准原子类型不能拷贝和赋值,他们没有拷贝构造函数和拷贝赋值函数。但是可以隐式转化为对应的内置类型。
std::atomic<>类模板不仅仅一套特化的类型,其作为一个原发模板也可以使用用户定义类型创建对应的原子变量。因为,它是一个通用类模板,操作被限制为load(),store()(赋值和转换为用户类型), exchange(), compare_exchange_weak()和compare_exchange_strong()。 每种函数类型的操作都有一个可选内存排序参数,这个参数可以用来指定所需存储的顺序。在5.3节中,会对存储顺序选项进行详述。现在,只需要知道操作分为三类:
- Store操作,可选如下顺序:memory_order_relaxed, memory_order_release, memory_order_seq_cst。
- Load操作,可选如下顺序:memory_order_relaxed, memory_order_consume, memory_order_acquire, memory_order_seq_cst。
- Read-modify-write(读-改-写)操作,可选如下顺序:memory_order_relaxed, memory_order_consume, memory_order_acquire, memory_order_release, memory_order_acq_rel, memory_order_seq_cst。 所有操作的默认顺序都是memory_order_seq_cst。
5.2.2 std::atomic_flag的相关操作
参考链接: C++11实现自旋锁;C++互斥量、原子锁、自旋锁等比较;C++11线程中的几种锁;
std::atomic_flag是最简单的标准原子类型,它表示了一个布尔标志。这个类型的对象可以
在两个状态间切换:设置和清除。std::atomic_flag 类型的对象必须被ATOMIC_FLAG_INIT初始化。当初始化完成之后,能够进行的操作就是销毁/清除clear()、设置(查询之前的值)test_and_set()。例如
//使用释放语义清除标志

f.clear(std::memory_order_release);
//使用默认内存顺序设置表示,检索旧值

bool x=f.test_and_set();
注意:std::atomic_flag操作不允许拷贝,因为当拷贝两个对象时操作不在作为原子性操作。
使用std::atomic_flag实现自旋锁
class spinlock_mutex
{
    //标准原子信号

    std::atomic_flag flag;
public:
    spinlock_mutex():flag(ATOMIC_FLAG_INIT){}
    void lock()
    {
        // 等待释放

        while(flag.test_and_set(std::memory_order_acquire)) {
            /* code */
        }
    }
    void unlock()
    {
        //清除释放数据

        flag.clear(std::memory_order_release);
    }
}
5.2.3 std::atomic的相关操作
使用store()写入(true或者false)还是浩宇std::atomic_flag中限制性很强的clear();使用exchange()成员函数允许你使用新选的值替换已经存储的值,并且自动的检索原始值。
std::atomic<bool> b;
//加载值
bool x=b.load(std::memory_order_acquire);
b.store(true);
//交换值

x=b.exchange(false,std::memory_order_acq_rel);
5.2.4 std::atomic 指针运算
std::atomic提供fetch_add和fetch_sub操作,在存储地址上做原子加减法。+=等操作也是直接在地址上进行加减操作。因为fetch_add()和fetch_sub()都是“读-改-写”操作,它们可以拥有任意的内存顺序标签,以及加入到一个释放序列中。指定的语序不可能是操作符的形式,因为没办法提供必要的信息:
这些形式都具有memory_order_seq_cst语义。
5.2.5 标准的原子整型的相关操作
在std::atomic<int>和 std::atomic<unsigned long long> 也
是有一套完整的操作可以供使用:fetch_add(), fetch_sub(),fetch_and(),fetch_or(),
fetch_xor(),还有复合赋值方式((+=,-=, &=,|=和^=),以及++和–(++x, x++,–x和x–)。
5.2.6 std::atomic<>主要类的模板
为了使用std::atomic<UDT>(UDT是用户定义类型),这个类型必须有拷贝赋值运算符。这就意味着这
个类型不能有任何虚函数或虚基类,以及必须使用编译器创建的拷贝赋值操作。
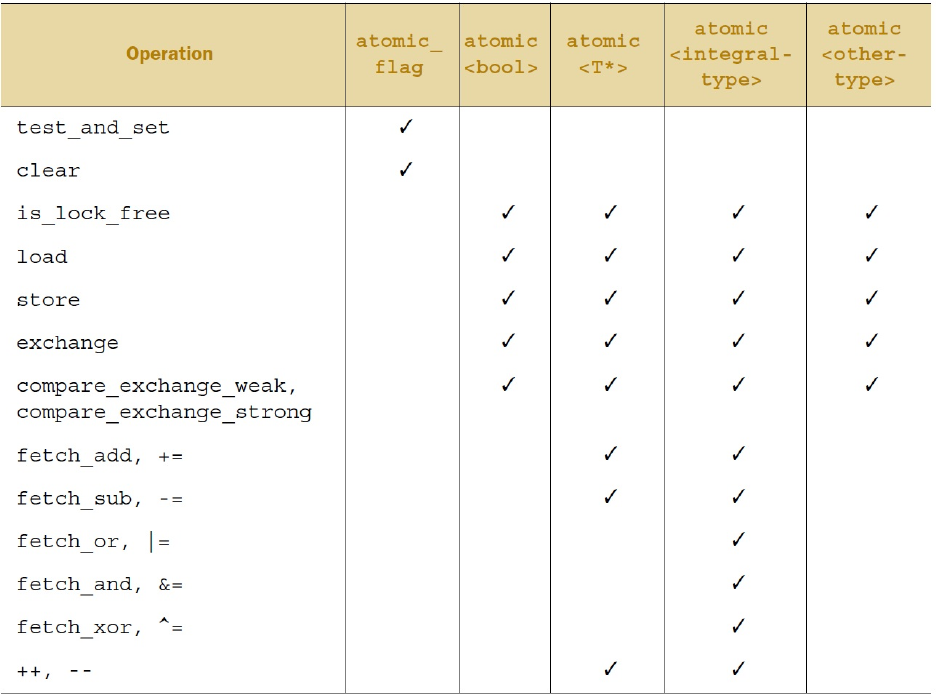
每一个原子类型所能用的操作
5.2.7 原子操作的释放函数
大多数非成员函数的命名与对应成员函数有关,但是需要“atomic_”作为前缀(比如, std::atomic_load() )。这些函数都会被不同的原子类型所重载。 在指定一个内存序列标签时,他们会分成两种:一种没有标签,另一种将“_explicit”作为后 缀,并且需要一个额外的参数,或将内存顺序作为标签,亦或只有标签( std::atomic_store(&atomic_var,new_value)与std::atomic_store_explicit(&atomic_var,ne w_value,std::memory_order_release )。原子对象被成员函数隐式引用,所有释放函数都 持有一个指向原子对象的指针(作为第一个参数)。
C++标准库也对在一个原子类型中的std::shared_ptr<>智能指针类型提供释放函数。
std::shared_ptr<my_data> p;
void process_global_data()
{
    std::shared_ptr<my_data> local=std::atomic_load(&p);
    process_data(local);
}
void update_global_data()
{
    std::shared_ptr<my_data> local(new my_data);
    std::atomic_store(&p,local);
}
5.3 同步操作和强制排序
简单的读写者同步问题
std::vector<int> data;
//数据访问互斥量

std::atomic<bool> data_ready(fasle);
void reader_thread()
{
    while(!data_ready.load()) {
        std::this_thread::sleep(std::milliseconds(1));
    }
    std::cout<<"The answer="<<data[0]<<"\m";
}
void writer_thread()
{
    data.push_back(42);
    data_ready=true;
}
5.3.3 原子操作的内存顺序
使用C++的原子操作时,如果这些系统有多个处理器,这些额外添加的同步指令可能会消耗大量的时间,从而降低系统整体的性能。多核之间的通信会降低其性能。
序列一致
#include <atomic>

#include <thread>

#include <assert.h>

std::atomic<bool> x,y;
std::atomic<int> z;

void write_x()
{
    x.store(true,std::memory_order_seq_cst);
}

void write_y()
{
    y.store(true,std::memory_order_seq_cst);
}

void read_x_then_y()
{
    //等待x为false

    while(!x.load(std::memory_order_seq_cst));
        if(y.load(std::memory_order_seq_cst))
        {
            ++z;
        }
}

void read_y_then_x()
{
    //等待y为false

    while(!y.load(std::memory_order_seq_cst));
        if(x.load(std::memory_order_seq_cst))
        {
            ++z;
        }
}

int int main(int argc, char const *argv[]) {
    x=false;
    y=false;
    std::thread a(write_x);
    std::thread b(write_y);
    std::thread c(read_x_then_y);
    std::thread d(read_y_then_x);

    a.join();
    b.join();
    c.join();
    d.join();
    assert(z.load!=0);
    return 0;
}
非限制操作只有非常少的顺序要求
#include <atomic>

#include <thread>

#include <assert.h>

std::atomic<bool > x,y;
std::atomic<int> z;

void write_x_then_y()
{
    x.store(true,std::memory_order_relaxed);
    y.store(true,std::memory_order_relaxed);
}

void read_y_then_x()
{
    //等待y改变
    while(!y.load(std::memory_order_relaxed));
        if(s.load(std::memory_order_relaxed))
        {
            ++z;
        }
}
int int main(int argc, char const *argv[]) {
    x=false;
    y=false;
    std::thread a(write_x_then_y);
    std::Thread b(read_y_then_x);
    a.join();
    b.join();
    assert(z.load()!=0);
    return 0;
}
非限制操作多线程版
#include <thread>

#include <atomic>

#include <iostream>

std::atomic<int> x(0),y(0),z(0);
std::atomic<bool> go(false);

unsigned const loop_count=10;

struct read_values
{
    int x,y,z;
};

read_values values1[loop_count];
read_values values2[loop_count];
read_values values3[loop_count];
read_values values4[loop_count];
read_values values5[loop_count];

void increment(std::atomic<int>* var_to_inc,read_values* values)
{
    while(!go) {
        //自旋,等待信号

        std::this_thread::yield();
    }
    for(unsigned i=0;i<loop_count;++i)
    {
        values[i].x=x.load(std::memory_order_relaxed);
        values[i].y=y.load(std::memory_order_relaxed);
        values[i].z=z.load(std::memory_order_relaxed);
        //更改值

        var_to_inc->store(i+1,std::memory_order_relaxed);
        //发送信号id

        std::this_thread::yield();
    }
}

void read_vals(read_values* values)
{
    while(!go) {
        //自旋,等待信号

        std::this_thread::yield();
    }
    for(unsigned i=0;i<loop_count;++i)
    {
        values[i].x=x.load(std::memory_order_relaxed);
        values[i].y=y.load(std::memory_order_relaxed);
        values[i].z=z.load(std::memory_order_relaxed);
        //发送信号id

        std::this_thread::yield();
    }
}

void print(read_values* v)
{
    for(unsigned i=0;i<loop_count;++i)
    {
        if(i){
            std::cout<<",";
        }
        std::cout<<"("<<v[i].x<<","<<v[i].y<<","<<v[i].z<<")";
    }
    std::cout<<std::endl;
}


int main()
{
        std::thread t1(increment,&x,values1);
        std::thread t2(increment,&y,values2);
        std::thread t3(increment,&z,values3);
        std::thread t4(read_vals,values4);
        std::thread t5(read_vals,values5);
        //开始执行主循环

        go=true;
        t5.join();
        t4.join();
        t3.join();
        t2.join();
        t1.join();
        print(values1);     //  7   打印最终结果
        print(values2);
        print(values3);
        print(values4);
        print(values5);
}
获取-释放序列(acquire-release ordering) 获取-释放序列中只将获取或者释放操作进行了原子化,相当于P/V操作。同一个线程相当于同步操作。
#include <atomic>

#include <thread>

#include <assert.h>

std::atomic<bool>   x,y;
std::atomic<int>    z;

void write_x()
{
    x.store(true,std::memory_order_release);
}
void    write_y()
{
        y.store(true,std::memory_order_release);
}
void    read_x_then_y()
{
        while(!x.load(std::memory_order_acquire));
        if(y.load(std::memory_order_acquire))
                ++z;
}
void    read_y_then_x()
{
        while(!y.load(std::memory_order_acquire));
        if(x.load(std::memory_order_acquire))
                ++z;
}
int main()
{
        x=false;
        y=false;
        z=0;
        std::thread a(write_x);
        std::thread b(write_y);
        std::thread c(read_x_then_y);
        std::thread d(read_y_then_x);
        a.join();
        b.join();
        c.join();
        d.join();
        assert(z.load()!=0);
}

//因为只能确定单个变量释放和获取的顺序,不确定X,y相对执行的顺序,当X,Y的读/写操作相对有序,即在同一个线程中时,不会产生断言。

#include    <atomic>

#include    <thread>

#include    <assert.h>
std::atomic<bool>   x,y;
std::atomic<int>    z;
void    write_x_then_y()
{
        x.store(true,std::memory_order_relaxed);
        y.store(true,std::memory_order_release);
}
void    read_y_then_x()
{
        while(!y.load(std::memory_order_acquire));
置为true
        if(x.load(std::memory_order_relaxed))
                ++z;
}
int main()
{
        x=false;
        y=false;
        z=0;
        std::thread a(write_x_then_y);
        std::thread b(read_y_then_x);
        a.join();
        b.join();
        assert(z.load()!=0);
}
同步传递相关的获取-释放序列:一个线程:存储-释放变量1;第二线程:加载-获取变量1-存储-释放-变量2;第三个线程:加载-获取变量2;
std::atomic<int>    data[5];

std::atomic<bool>   sync1(false),sync2(false);


void    thread_1()
{
        data[0].store(42,std::memory_order_relaxed);
        data[1].store(97,std::memory_order_relaxed);
        data[2].store(17,std::memory_order_relaxed);
        data[3].store(-141,std::memory_order_relaxed);
        data[4].store(2003,std::memory_order_relaxed);
        //  1.设置sync1

        sync1.store(true,std::memory_order_release);
}

void    thread_2()
{
        //  2.直到sync1设置后,循环结束

        while(!sync1.load(std::memory_order_acquire));
        //  3.设置sync2

        sync2.store(true,std::memory_order_release);
}

void    thread_3()
{
        //  4.直到sync1设置后,循环结束

        while(!sync2.load(std::memory_order_acquire));

        assert(data[0].load(std::memory_order_relaxed)==42);
        assert(data[1].load(std::memory_order_relaxed)==97);
        assert(data[2].load(std::memory_order_relaxed)==17);
        assert(data[3].load(std::memory_order_relaxed)==-141);
        assert(data[4].load(std::memory_order_relaxed)==2003);
}
获取-释放序列和memory_order_consume的数据相关性
memory_order_consume很特别:它完全依赖于数据,这里有两种新关系用来处理数据依赖:
-
前序依赖(dependency-ordered-before):
当A前序依赖B,那么A线程间也前序依赖B。
-
携带依赖(carries-a-dependency-to):
如果A操作结果要使用操作B的操作数,而后A将携带依赖于B。如果A操作的结果是一个标量,比如int,而后的携带依赖关系仍然适用于,当A的结果存储在一个变量中,并且这个变量需要被其他操作使用。这个操作是也是可以传递的,所以当A携带依赖B,并且B携带依赖C,就额可以得出A携带依赖C的关系。
有时,你不想为携带依赖增加其他的开销。你想让编译器在寄存器中缓存这些值,以及优化重排序操作代码,而不是对这些依赖大惊小怪。这种情况下,你可以使用std::kill_dependecy()来显式打破依赖链。std::kill_dependency()是一个简单的函数模板,其会复制提供的参数给返回值,但是依旧会打破依赖链。例如,当你拥有一个全局的只读数组,当其他线程对数组索引进行检索时,你使用的是std::memory_order_consume,那么你可以使用std::kill_dependency()让编译器知道这里不需要重新读取该数组的内容,就像下 面的例子一样:
int global_data[]={...};
std::atomic<int> index;

void f()
{
    //需要释放index之后才能加载

    int i=index.load(std::memory_order_consume);
    //打断依赖,直接执行操作,不需要等待index.load之后执行。

    do_something_with(global_data[std::kill_dependency(i)]);
}
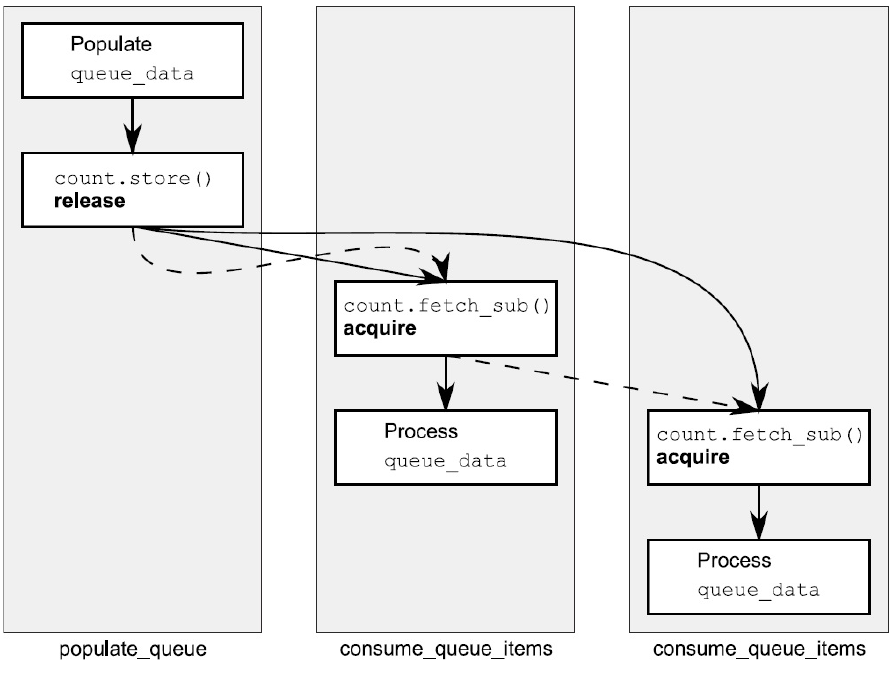
5.3.4 释放队列与同步
#include <atomic>

#include <thread>

std::vector<int> queue_data;
std::atomic<int> count;
void populate_queue()
{
    unsigned const number_of_items=20;
    queue_data.clear();
    for(unsigned i=0;i<number_of_items;++i)
    {
        queue_data.push_back(i);
    }
        //1 初始化存储

    count.store(number_of_items,std::memory_order_release);
}
void consume_queue_items()
{
    while(true)
    {
        int item_index;
        //2 一个“读-改-写”操作

        if((item_index=count.fetch_sub(1,std::memory_order_acquire))<=0)
        {
            //3 等待更多元素

            wait_for_more_items();
            continue;
        }
        //4 安全读取queue_data

        process(queue_data[item_index-1]);
    }
}
int main()
{
    std::thread a(populate_queue);
    std::thread b(consume_queue_items);
    std::thread c(consume_queue_items);
    a.join();
    b.join();
    c.join();
}
5.3.5 栅栏
参考链接: atomic_thread_fence
栅栏操作会对内存序列进行约束,使其无法对任何数据进行修改,典型的做法是与使用memory_order_relaxed约束序的原子操作一起使用。它属于全局操作,可以影响到在线程中的其它原子操作。
栅栏让自由操作变的有序
#include    <atomic>

#include    <thread>

#include    <assert.h>

std::atomic<bool>   x,y;
std::atomic<int>    z;
void    write_x_then_y()
{
        x.store(true,std::memory_order_relaxed);
        //释放栅栏

        std::atomic_thread_fence(std::memory_order_release);
        y.store(true,std::memory_order_relaxed);
}
void    read_y_then_x()
{
        //

        while(!y.load(std::memory_order_relaxed));
        //获取栅栏,与释放栅栏相结合,使得x的存储发生在获取之前。

        std::atomic_thread_fence(std::memory_order_acquire);
        //因为栅栏,x顺序化

        if(x.load(std::memory_order_relaxed))
                ++z;
}
int main()
{
        x=false;
        y=false;
        z=0;
        std::thread a(write_x_then_y);
        std::thread b(read_y_then_x);
        a.join();
        b.join();
        //因为栅栏原因,不会触发断言,但是当存储放在栅栏释放之后,就可能发生断言

        assert(z.load()!=0);
}
注意: 但是这里有一点很重要:同步点,就是栅栏本身。下面的代码就不一定能保证不发生断言了
void write_x_then_y()
{
    std::atomic_thread_fence(std::memory_order_release);
    x.store(true,std::memory_order_relaxed);
    y.store(true,std::memory_order_relaxed);
}

//这里栅栏的同步点就是它本身,相当于释放过后,thread b 紧跟对齐的代码是 if(x.load(...));a的代码是x.store...;y.store... 回到了最初的状况,x之间的顺序性被打乱。
5.3.6 原子操作对非原子的操作排序
#include <atomic>

#include <thread>

#include <assert.h>

//定义非原子变量x

bool x=false;
//互斥信号变量

std::atomic<bool> y;
//资源信号量

void write_x_then_y()
{
    //在栅栏前存储x

    x=true;
    //释放栅栏

    std::atomic_thread_fence(std::memory_order_release);

    y.store(true,std::memory_order_relaxed);
}
void read_y_then_x()
{
    //在y被写入前持续等待

    while(!y.load(std::memory_order_relaxed));
    std::atomic_thread_fence(std::memory_order_acquire);
    if(x){
        ++z;
    }
}

int main(int argc, char const *argv[]) {
    x=false;
    y=false;
    z=0;
    std::thread a(write_x_then_y);
    std::thread b(read_y_then_x);
    a.join();
    b.join();
    assert(z.load()!=0);
    return 0;
}